Unlock the Secret to Perfect Homemade Whole Wheat Bread: Soft, Hearty & Beginner-Friendly
Are you tired of store-bought whole wheat bread that's either cardboard-dense, crumbly, or leaves a slightly bitter aftertaste? Imagine slicing into a warm, fragrant loaf, its crust perfectly golden, its interior incredibly soft and chewy, ready for your favorite sandwich or a slather of butter. This isn't a fantasy; it's the reality you can create in your own kitchen! Mastering
how to make whole wheat bread at home might sound daunting, but with this comprehensive, beginner-friendly guide, you'll be baking loaves that are not only healthier but truly superior in flavor and texture to anything you've ever bought. This recipe demystifies the process, making that comforting aroma of freshly baked bread a regular feature in your home.
Why This Whole Wheat Bread Recipe Stands Out: Softness, Flavor, and Unbeatable Ease
Many people shy away from baking with 100% whole wheat flour, fearing a heavy, unpalatable result. Our recipe is specifically designed to counteract these common pitfalls, delivering a loaf that’s both nourishing and incredibly satisfying. It’s a versatile and forgiving approach, making it ideal for anyone learning
how to make whole wheat bread at home, from absolute novices to seasoned bakers.
Here’s what makes this particular homemade whole wheat bread a game-changer:
*
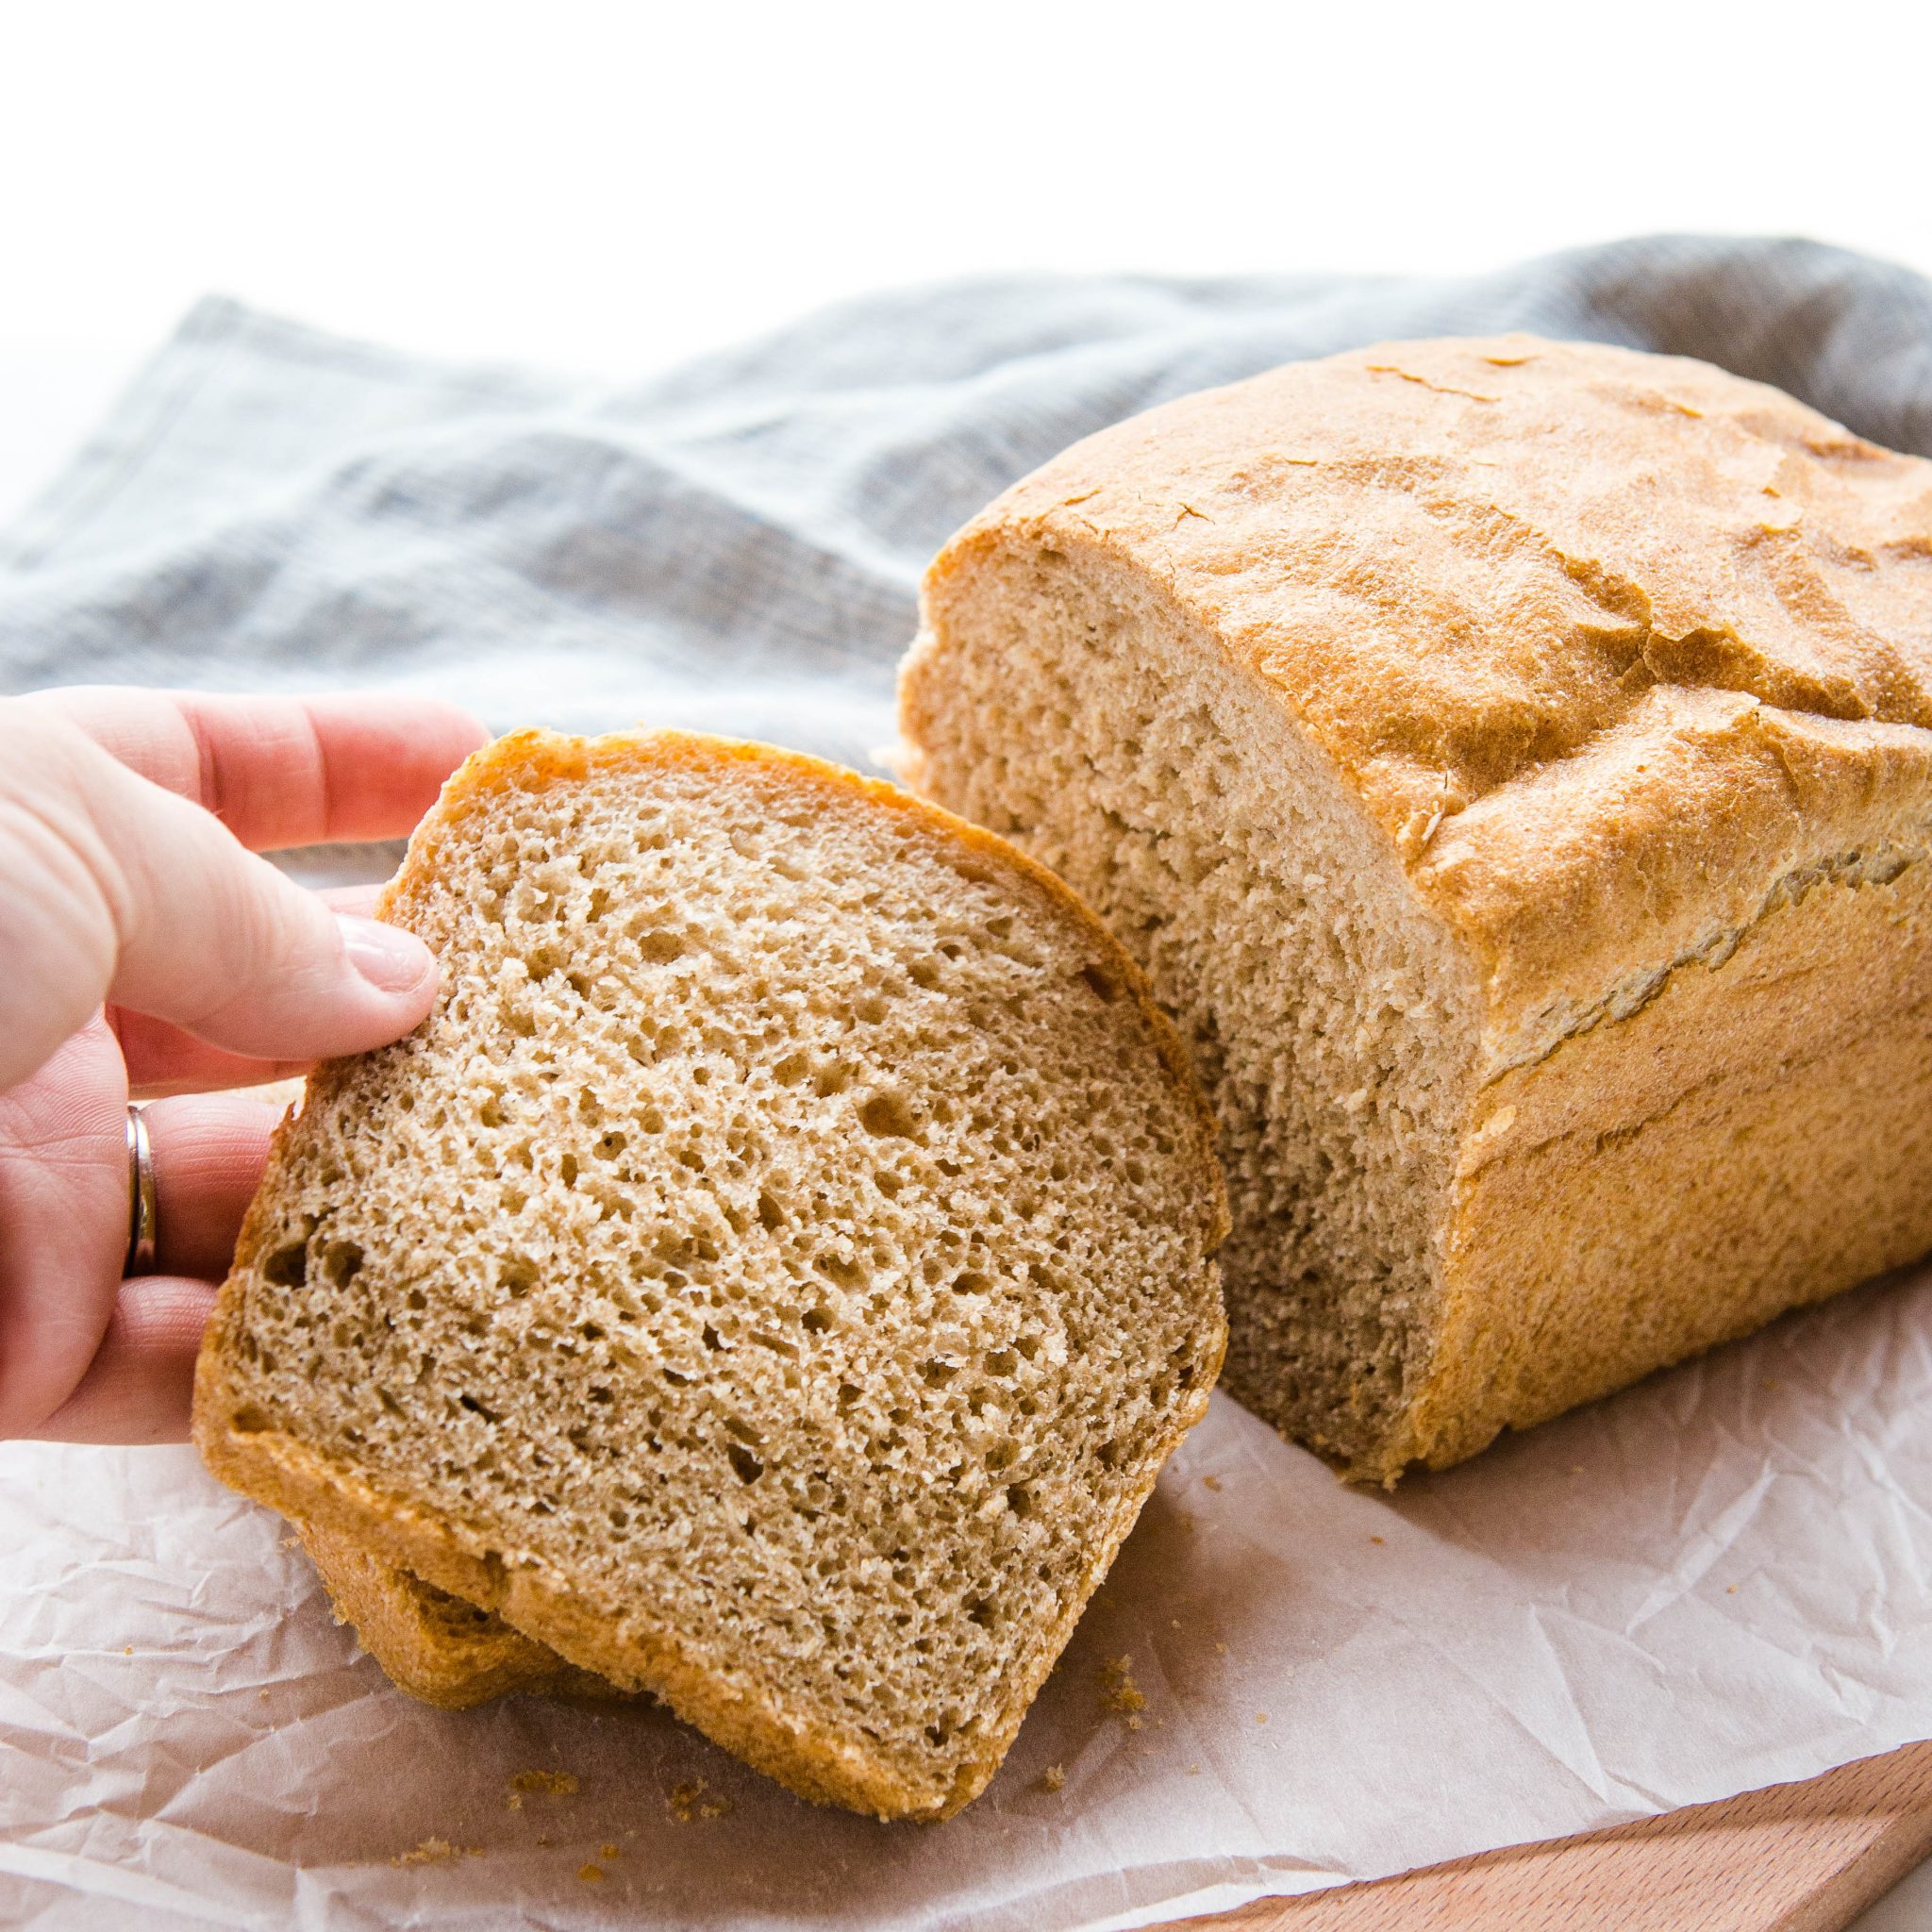
Exceptional Texture: You'll achieve a perfect balance – a chewy, tender crumb contrasted with a delightful golden, slightly crisp crust. Say goodbye to brick-like loaves!
*
Balanced Flavor Profile: Natural sweetness from honey harmonizes beautifully with the inherent earthiness of whole wheat, creating a bread that's rich without being overwhelming.
*
Freezer-Friendly & Make-Ahead: Bake a few loaves at once! This bread freezes beautifully, allowing you to always have a wholesome option on hand for busy weeks.
*
Simple Pantry Staples: No exotic ingredients required. This recipe relies on basic items you likely already have, proving that superior bread doesn't need a specialty store.
*
Adaptable Flour Ratios: While designed for 100% whole wheat, it’s forgiving enough to incorporate a mix with bread flour if you prefer a slightly lighter texture, offering flexibility for your preferences.
*
Ultimate Versatility: Perfect for everyday sandwiches, toasted with jam for breakfast, or even transformed into the most delicious French toast.
This recipe truly proves that eating healthy doesn't mean sacrificing deliciousness. You'll love discovering
how to make whole wheat bread at home that combines hearty nutrition with an unbelievably soft crumb.
Essential Ingredients for Unforgettable Whole Wheat Bread
The magic of this recipe lies in a carefully selected blend of just a few ingredients, each playing a crucial role in achieving that perfect soft, hearty loaf. Understanding their function is key to mastering
how to make whole wheat bread at home successfully.
*
Whole Wheat Flour: The star of the show! It provides fiber, nutrients, and that characteristic hearty flavor. Using fresh whole wheat flour can make a noticeable difference in taste and texture. Ensure it's stored properly to prevent rancidity.
*
Water: Essential for hydrating the flour, activating the yeast, and forming the dough's structure. The temperature is critical – too cold and yeast won't activate; too hot and it will die.
*
Whole Milk: Adds richness, tenderness, and a lovely golden hue to the crust. The fats and sugars in milk contribute significantly to a softer crumb and improved flavor.
*
Honey: Beyond its natural sweetness, honey acts as food for the yeast, promoting a more vigorous rise and adding a unique depth of flavor that complements whole wheat beautifully.
*
Unsalted Butter: This ingredient is a secret weapon for softness and flavor. Butter tenderizes the crumb, keeps the bread moist, and adds a luxurious richness.
*
Active Dry or Instant Yeast: The leavening agent responsible for making your bread rise. Both types work well here, though instant yeast can sometimes speed up proofing times slightly. Ensuring your yeast is fresh and active is paramount for a good rise.
*
Lemon Juice (or Apple Cider Vinegar): This might seem unusual, but a small amount of acid from lemon juice or apple cider vinegar does wonders. It helps to balance out any potential bitterness from the wheat germ and can even strengthen gluten development for a better structure.
*
Salt: Crucial for flavor balance, salt also helps to regulate yeast activity and strengthen the gluten network, contributing to better dough structure and volume.
*
Optional Oats + Egg White: For a rustic appearance and a touch of extra texture, brushing the top with an egg white wash and sprinkling with oats before baking is a wonderful addition.
These thoughtfully chosen ingredients work in synergy to combat the common issues of dense, dry, or bitter whole wheat loaves, transforming the art of
how to make whole wheat bread at home into a consistently rewarding experience.
Smart Ingredient Swaps and Customization Tips
One of the great joys of baking your own bread is the ability to customize it to your liking or dietary needs. This recipe is wonderfully flexible! For even more detailed insights into ingredient flexibility, check out
The Best Soft Whole Wheat Bread: Versatile Recipe & Ingredient Swaps.
*
Milk Alternatives: If you're dairy-free, feel free to substitute whole milk with almond, oat, or soy milk. The fat content might vary, which can slightly affect the crumb, but the results will still be delicious.
*
Sweeteners: Maple syrup or brown sugar can stand in for honey. While honey adds a distinct flavor and moisture, these alternatives will still feed the yeast and provide sweetness. Adjust quantities to your taste.
*
Flour Mix: For a lighter loaf that's still hearty, swap 1 cup of whole wheat flour with bread flour. This slightly reduces the whole wheat content but makes the bread exceptionally airy without sacrificing much flavor.
*
Lemon Juice Substitute: Apple cider vinegar is a perfect 1:1 substitute for lemon juice, offering the same acidity benefits to balance flavors and aid dough structure.
*
Butter Alternatives: For a vegan or dairy-free version, use an equal amount of good quality vegan butter or olive oil. Keep in mind that olive oil has a distinct flavor that will subtly alter the bread's profile.
These simple adjustments ensure that you can enjoy this incredible homemade whole wheat bread regardless of pantry stock or dietary preferences.
Step-by-Step Guide: Mastering Homemade Whole Wheat Bread
Embarking on the journey of
how to make whole wheat bread at home is deeply satisfying. Follow these steps carefully, and you'll soon be enjoying your own masterpiece.
1.
Create the Sponge (The Flavor Foundation): In a large mixing bowl (or the bowl of your stand mixer), combine 1 cup of warm water (around 105-115°F / 40-46°C), the whole milk, yeast, and 2 cups of the whole wheat flour. Mix these ingredients thoroughly until you have a thick, shaggy batter. Cover the bowl with plastic wrap or a clean kitchen towel and let it rest at room temperature for 60-90 minutes. During this time, the yeast will activate, bubble, and the mixture should double in size. This "sponge" step is crucial for developing deep flavor and strengthening the gluten structure, contributing significantly to a soft, chewy texture.
2.
Form the Dough: To your activated sponge, add the honey, softened unsalted butter, lemon juice, and salt. Begin adding the remaining whole wheat flour, about 1 cup at a time, mixing until it’s mostly incorporated. The dough will start to pull away from the sides of the bowl as it comes together.
3.
Knead to Perfection: Turn the dough out onto a lightly floured surface or attach the dough hook to your stand mixer. Knead for 8-10 minutes (by hand) or 6-8 minutes (with a stand mixer on medium-low speed). The dough should become smooth, elastic, and pass the "windowpane test" – you should be able to stretch a small piece thin enough to see light through it without tearing. This process develops the gluten, which is what gives bread its structure and chewiness.
4.
First Rise (Bulk Fermentation): Lightly grease a large bowl with a little oil. Place the kneaded dough in the bowl, turning it once to coat the top. Cover the bowl tightly with plastic wrap or a damp towel and let it rise in a warm, draft-free place for 60-90 minutes, or until it has visibly doubled in size. This initial rise is vital for flavor development and texture.
5.
Shape the Loaves: Gently punch down the risen dough to release the air. Divide the dough into two equal portions. On a lightly floured surface, shape each portion into a rectangular loaf that fits your standard 9x5 inch loaf pans. You can achieve this by flattening the dough into a rectangle, then folding the long sides towards the center, pinching the seam, and gently rolling it into a log.
6.
Second Rise (Proofing): Place the shaped loaves into lightly greased loaf pans. Cover them loosely with plastic wrap or a kitchen towel and let them rise again in a warm spot for another 45-60 minutes, or until they have nearly doubled in size and look puffy. Towards the end of this rise, preheat your oven to 375°F (190°C).
7.
Bake Your Bread: If using the optional egg wash and oats, brush the tops of the loaves with a lightly beaten egg white and sprinkle with rolled oats. Place the loaf pans in the preheated oven. Bake for 30-35 minutes, or until the crust is deeply golden brown and the internal temperature reaches 200-210°F (93-99°C) when measured with an instant-read thermometer. For a comprehensive guide on ensuring your loaves are never dense or bitter, refer to
Bake Soft Whole Wheat Bread: No More Dense or Bitter Loaves!
8.
Cool Completely: This step is often rushed but is absolutely critical! Once baked, immediately remove the loaves from their pans and place them on a wire rack to cool completely. Cooling allows the internal structure of the bread to set and the moisture to redistribute, preventing a gummy texture. Resist the urge to slice until fully cool – about 1.5 to 2 hours.
Tips for Whole Wheat Bread Success (and Troubleshooting)
Baking is a science, but it also benefits from intuition. Here are some extra tips to ensure your whole wheat bread is a triumph every time:
*
Measure Accurately: Especially with flour, weighing your ingredients (in grams) is far more accurate than using volume measurements (cups). Too much flour can lead to a dense, dry loaf.
*
Yeast Activity Check: If your yeast doesn't become foamy and active after 5-10 minutes in the warm liquid (the sponge stage), it's likely dead. Start over with fresh yeast to avoid disappointment.
*
Proofing Environment: A warm, humid environment is ideal for rising. If your kitchen is cool, try placing the covered bowl in a slightly warm (but turned off) oven or microwave with a cup of hot water.
*
Don't Rush the Rise: Rushing the proofing process will result in a dense loaf. Let the dough take its time to double. A slow, steady rise builds flavor and proper texture.
*
Oven Temperature: Invest in an oven thermometer to ensure your oven is truly at the set temperature. Inaccurate temperatures can greatly affect baking time and crust development.
*
Storage: Once cooled, store your homemade whole wheat bread at room temperature in an airtight container or bread bag for 3-4 days. For longer storage, slice and freeze for up to 3 months.
Learning
how to make whole wheat bread at home is an incredibly rewarding skill. With this recipe and these tips, you're well on your way to baking consistently delicious, soft, and hearty loaves that will become a staple in your kitchen.
Conclusion: The Joy of Homemade Whole Wheat Bread
There’s truly nothing quite like the experience of baking your own bread. From the moment the aroma fills your kitchen to that first, warm slice, the journey of learning
how to make whole wheat bread at home is incredibly fulfilling. This beginner-friendly recipe ensures that even those new to baking can achieve a loaf that is perfectly soft, wonderfully hearty, and bursting with wholesome flavor – far surpassing any store-bought alternative. Embrace the process, savor the aroma, and delight in the taste of real homemade bread. Your kitchen (and your taste buds) will thank you!